Windows 11 & 10 guide

Change your second monitor’s brightness.

Adjust the monitor connected to your laptop without changing the laptop screen. Choose the monitor in Display Dimmer, then set a level that feels right.

Individual brightness control is free. Pro is optional.

Choose one screen

Select the monitor’s name instead of All displays.

Keep the laptop as it is

Adjust the selected monitor while leaving the other screen alone.

Use the free controls

Manual brightness control for individual displays is included with Free.

Why do the brightness keys only change the laptop screen?

A laptop’s brightness keys and the Windows brightness slider usually control its built-in display. Connecting a second monitor does not necessarily give it a separate slider in Windows Settings.

You can use the external monitor’s buttons or joystick to change its brightness. For control from your keyboard and mouse, Display Dimmer provides its own display selector and brightness slider.

Microsoft also points external-monitor users to the monitor’s own controls in its Windows brightness instructions.
A laptop + monitor walkthrough

Change the connected monitor’s brightness, step by step

  1. Install and open Display Dimmer. Get the free app from the Microsoft Store and open its main window from the Start menu or tray icon.
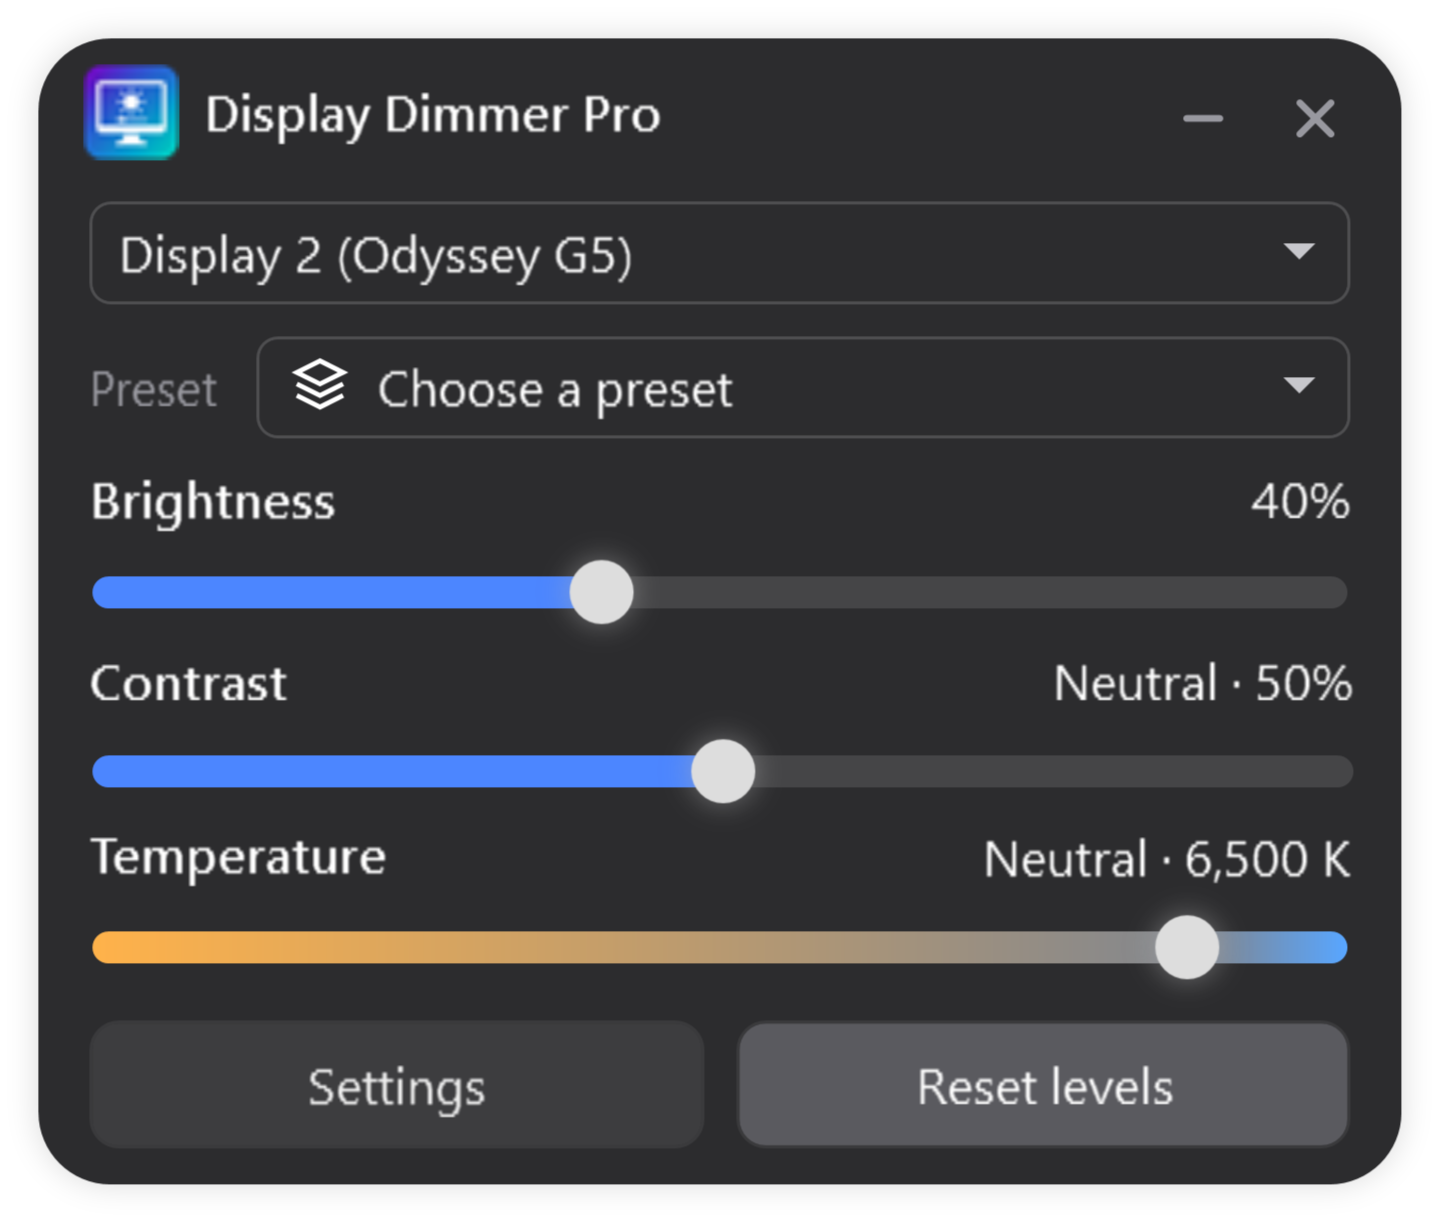
  2. Choose the external monitor. Open the display selector at the top of the main window and select the monitor’s name. For this task, leave All displays unselected.
Display Dimmer 2.2.17 main window with Display 2 (Odyssey G5) selected and brightness set to 40 percent.
Choose the monitor’s name here. Pro shown; individual brightness control is free.
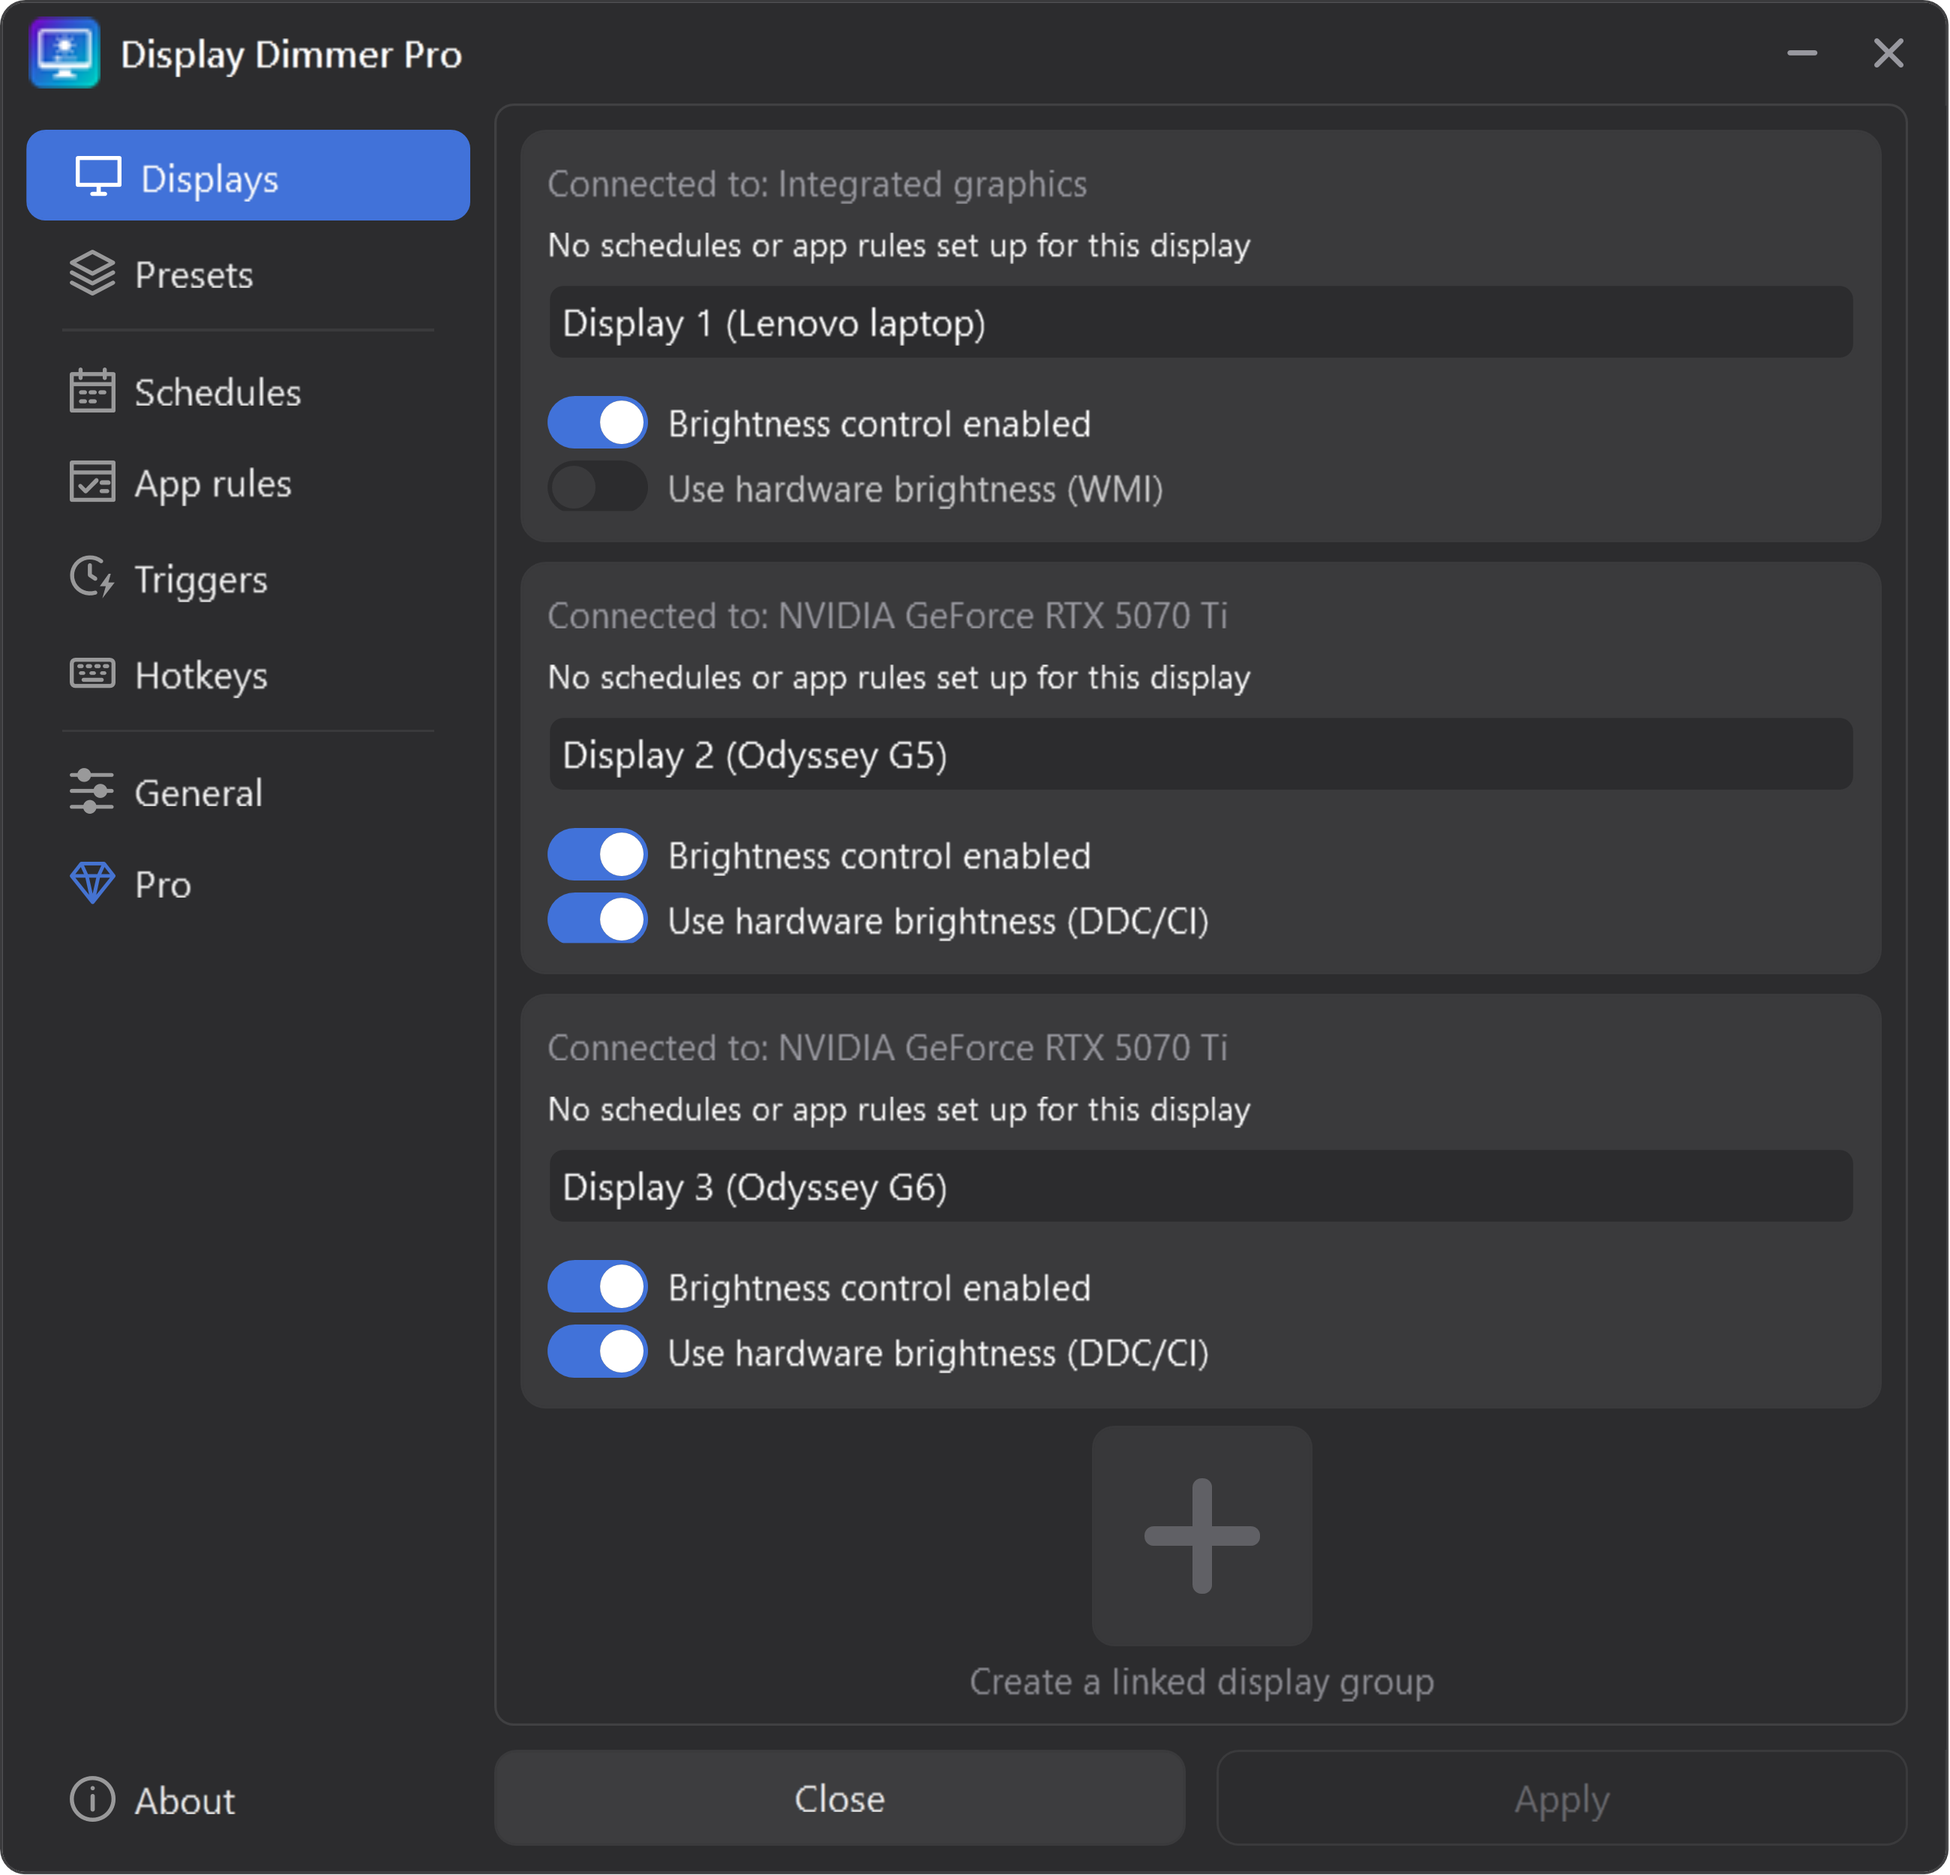
  1. Check Settings → Displays. On that monitor’s card, keep Brightness control enabled on. If it supports hardware control, enable Use hardware brightness (DDC/CI) and enable DDC/CI in the monitor’s own menu.
  2. Move the main window’s Brightness slider a little. Watch the external monitor to confirm it responds. Your laptop should keep its current level. Select the laptop’s name only when you want to adjust it separately.
Display Dimmer 2.2.17 Displays settings: a Lenovo laptop uses software brightness with WMI off, while Odyssey G5 and G6 monitors have DDC/CI hardware brightness enabled.
Display Dimmer 2.2.17: each display has its own brightness method. The laptop’s WMI option does not control the external monitors. This example shows Pro; individual manual brightness control is free. Select the image to view it full size.

Keep the target specific. The display selector decides which screen a manual adjustment affects. You do not need to disable the laptop’s brightness control to adjust the monitor on its own.

Have two external monitors instead? Select each monitor’s name in turn and set its brightness separately. The same workflow applies.

Choose the right method for that monitor

Hardware brightness with DDC/CI

Changes the monitor’s own brightness setting. Enable DDC/CI in the monitor’s menu and the matching hardware switch in the app. Support depends on the monitor and connection.

Check that hardware brightness is working →

Software dimming as a fallback

If hardware control fails, turn Use hardware brightness (DDC/CI) off for that monitor. Software dimming darkens the picture while leaving the monitor’s hardware setting alone.

Compare hardware and software control →

In 2.2.17, these display switches take effect immediately. Older versions may require Apply. Software dimming can be limited by HDR or graphics-driver behavior; test with HDR temporarily off if the image does not change.

Still too bright at the monitor’s lowest setting? Follow the below-minimum dimming steps to lower hardware brightness before adding software dimming.

If the wrong screen changes—or nothing happens

Both screens change
Check the main-window selector. Choose the individual monitor rather than All displays or a linked group. Also check for active schedules or app rules that target other screens.
The monitor is missing
First confirm Windows recognizes it under Settings → System → Display. In Display Dimmer, check that its brightness control is enabled. Use an extended desktop when you want separate screen content and control.
The monitor is listed but does not respond
Confirm DDC/CI is enabled in the monitor’s menu. Try connecting it directly: a dock, adapter, or KVM can pass video while blocking brightness commands. See the USB-C dock checks, or try software dimming.
The brightness changes back later
Look for an active schedule, app rule, or another display-control app applying a different level. Follow the brightness keeps resetting guide to trace the cause.

Second-monitor brightness questions

Can I adjust the external monitor without changing my laptop’s brightness?

Yes, when the display and control method support it. Select the external monitor by name in Display Dimmer, then change Brightness. All displays is for adjusting enabled screens together.

Do I need Pro for separate brightness levels?

No. Manual brightness control for individual displays is free. Pro adds features such as per-display automation, saved presets, linked groups, and ongoing color temperature control. See the Free and Pro comparison.

Will this add an external-monitor slider to Windows Settings?

No. Use the selector and slider in Display Dimmer’s own window. For the missing native Windows control, see the external-monitor slider guide.

Should the laptop and monitor use the same percentage?

Not necessarily. The same percentage can look different on different screens or control methods. Set each one by eye for your room; app percentages are not calibrated light-output measurements.

One monitor at a time. One place to adjust it.

Get individual brightness controls for your Windows setup.

Install free